

Many of you know that I have been working on my master bath since Spring. I was unhappy with the overall contemporary style of the room and wanted it to flow with my master bedroom. I revealed my master bedroom makeover a few months back. This is what it looks like.

 She came up with very beautiful drawings, but just the cabinetry bid came in close to $10,000! Talk about shock. Understand something....there is nothing wrong with the present cabinetry. All they really needed was a re-style, but you are hard pressed to find anyone who is willing to just switch out the cabinet doors and such. I figured that I was back out on my own. I spent a month beating myself up for having spent the money and searching for ideas that were more affordable.
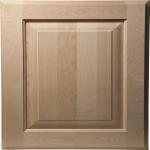 I considered buying special order, unfinished raised panel doors at a cost of 50 dollars a door. After all, I could refinish them myself. Then, I came up with a crazy plan and put it into action. You know what? It worked! It worked so well, I wish I could post this everywhere so that all DIYers out there can see this.
 Here is what it looked like sitting getting ready for refinishing.
 |
| Ready for refinishing |
 |
| Backside of cabinet with bead board set in. |
 |
| Look at the routed decorative edge! The white paint just brought it right out! |
We installed the doors this past week and here is what they look like now.


I am so excited about the results of this project. Instead of $10,000, the project came in at about $250. (I paid Ed to do the router and bead board work, plus materials) Not bad, I'd say. If you notice, I changed out the knobs too. I will talk about the knob project sometime in the next few days and show you how I made them.
For those of you who haven't seen the before images, I put together these two collages.


I hope this project inspires you. Do you have cabinetry somewhere in your house that you just don't love the appearance, but feel like it isn't up to the rigors of a re-surface? Well, I am here to tell you that you just may be able to pull something off for very few dollars! I'm am not going to sit here and tell you that this was the easiest project ever. It took a lot of diligence and patience. In the end, it paid off.
*****UPDATED TO THIS POST! If you want to hop over and see the cabinet knob tutorial post Cabinet Knobs Using Stones and Jute there will be a back link to this post.*******
-The End-
Featured!! Yeah!!!

Linking to:


23 comments:
Just gorgeous! And to think you of what you started with?!? Great job!
WOW!!! Lesley, this is an amazing transformation! And the price... I can't believe you did it all for that price! Fantastic job! :) And I love your bedroom. Gorgeous!
Your before and after photos are AMAZING! I can hardly believe this is the same room. Absolutely, completely, stunningly gorgeous! I am sure you will LOVE it for a long time to come!
P.S. Will you share some close-ups of your cabinet pulls? I can't get a good look at them! And I would love to know the wall color--I am lousy at choosing yellows!
LOVE the makeover - great job!
Wow Lesley!!! Fabulous. You give me great hope that the "house of oak" could someday all be changed!
Deb
Lesley they turned out FABULOUS! Love your bathrooms new look! Martina
OH WOW!!!!! it is stunning! amazing job, lesley!!!!!
OHH WOW!!! it a gorgeous!
Creat A Design
I can hardly believe it's the same room! The cabinets look amazing and the room is so bright and cheerful now. I bet you smile every time you walk into the room. You've been BUSY!!!
I would have never guessed you could pull those off with that style of door. Your new bathroom looks wonderful!
Amazing! I love it!
Wow that is fan.tab.u.lous and amazing. It doesn't even look like the same room. You did a great job. Gosh, would you share this at Sunday's Best going on now. Sharing is a good thing!
Oh how I wish I had read this post about 5 years ago! I was stuck with melamine cabinets in my old master suite because I didn't think I would be able to do anything to change them. Amazing! Would never have guessed those were the same doors!
Just beautiful! Great job!!
Unbelievable transformation. Great idea!
Wow. What a difference. Great job.
No one would ever guess in a million years that your before is also your after. (with modifications of course) Looks like at least $9.999 worth of updating! Can I get Ed's phone number??? LOL
With time, elbow grease, and a little savvy you've saved a lot of money and you have something that looks custom. Great inspiration. You should be very proud of your work.
I loved how this turned out!
Please come to our party at:
www.mychristian-life.blogspot.com
Hi! I pinned this on Pinterest, posted on fb, tweeted on Twitter and stumbled on Stumble Upon. Please feel free to grab the feature button. Thanks for linking up at the Creative Bloggers' Party & Hop :)
Great job, thanks for sharing.
I still can't get over how amazing these cabinets turned out!!!! LOVE them!
Post a Comment