Sunday, February 26, 2012

Black History Month Event Centerpiece

February is coming to a close.  
Can you believe that?!  It's almost March already... Time is flying by...

This past month I had the honor of helping out my friend, Ken, with centerpieces for a Black History Month Luncheon with a guest list of over 200 people with 22 tables.  The budget was tight, but he put together 22 pots with beautiful white petunias.  He then added these funky circles to the center of each arrangement that I made for him.

Materials
Craft Paper (in the color of the African American Flag)
Images of famous people/leaders in Black American History (past and present)
skewers
glue stick
hot glue gun with sticks
scissors
Numbers ( I made mine out of paper with my Silhouette Cameo)
Curling Ribbon

I first researched and compiled a list of 22 famous people, searched and found images on the Internet and printed them on regular printer paper.  I then simply free form cut out the papers layering them to give it a fun and funky look and gluing them together with a glue stick.  I hot glued the skewer to the back and added a table number.  I then finished off each piece with curling ribbon to add a little 'something.'


Ken printed out a copy of the list with the name of each famous person, so that the guests had a source to look up who was the dignitary they were "seated with" for the luncheon.  Obviously people like Martin Luther King, Jr. and Condoleezza Rice were easy ones.  But I put a few tougher gets...like Congressman John Lewis's image was back in 1961 when he participated in the Freedom Rider events during the 1960's Civil Rights Movement.   When the guests arrived, they were able to mingle from table to table honoring each amazing Black American.

So many times we spend a ton of time and effort to make centerpieces beautiful or different.  It was nice to add meaningful element that was also somewhat educational.  The guests really appreciated it.  I enjoyed helping out a friend.

-The End-

Wednesday, February 22, 2012

Quick Stop at Thrift Shop Yields a Few Finds And A Question

I dropped in at my local Goodwill yesterday afternoon.  My daughter is in the school play, Peter Pan, next month and I needed a few old blanket props for the Lost Children.  But, you know me.  I had to take a look around and I found a few interesting things for next to nothing.


The box is going to get a spruce up and be used in my Master Bath to store my cosmetics. I love the handle...kinda beachy.  The light switch covers were only 25 cents.  I have no idea what I might do with them.  They will most likely be re-purposed since my home doesn't have any one switch units.  The little bird house was only 50 cents.  It will pop up somewhere soon.  The other birdie thing?  I have no earthly idea what it is?  Do you?  It is a very heavy iron material. The inside of the cloche part has a hook at the inside top. It's total height is about 8 inches.   Somebody help me out here...

I have been doing a few little things in the studio, but haven't taken images of them.  I promise I will in the next few days.   In the meantime...help a gal out and tell me what this birdie thing is, will ya?!!

-The End-

Sunday, February 19, 2012

Blast from the Past: Simple Chandy Decor

Many of you who follow The Homeless Finch found me way after I started blogging.  I remember days gone by when I was working in my studio, blogging about my projects and I only had about 20 followers who were mainly friends from my 'real' world life.  Because of this, I have decided to bring to you from time to time some of my Blasts From the Past Blog Posts.  Ya know...stuff I did before you found me, but stuff I think is worthy to re-visit and highlight.  I am calling these my "Blast From The Past Posts" and on days like today, I will re-introduce them.   For those who missed this stuff....hope you enjoy!

This post was published within the first 2 weeks of my blog back in April of 2011.  I have been spending a lot of time in the last few days re-evaluating The Homeless Finch and trying to connect with why I started to blog in the first place.  This was my first tutorial.  I think the project is worthy enough to re-post.  I was still using flash, so excuse the quality of some of the images.  

Blast from the Past:  How to:  Simple Chandelier Decor


So, as promised, here is my "How To" project on how to simply dress up your dining room light fixture for Spring. (and summer if you forget to take it down)  You don't need a lot of supplies to make this happen.  Above is an image of my dining room chandelier.   Pretty cool, eh?  I bought it several years back at one of my favorite stores that has since closed down.  I have had it in three of my homes and will never ever sell it with a house.
Supplies
Pair of pliers (Preferably a pair that also does wire cutting)
  Green twist tie (I buy it by the roll and use it for everything.  It's great for tying up kids.) 
Long stemmed flowers. 


I quick comment about how to pick the right flower for your home.  I just painted the interior of my house.  It needed a fresh color.  As you can see in the background of this image, I chose an asparagus green.  It's bright and happy.  When I saw these roses, the touches of green were similar to my new walls, so I knew they would look awesome.  So, pay attention to the colors in your room even if you would call it neutral.  Take that color as a cue.  It helps. 

So, take your long stem flower and temporarily take off the leaves.  They just get in the way and you can pop them back on later. Besides, you might damage the fragile leaves in the process.  (Learned that one the hard way.)  Next you are going to start forming the ring buy bending the stem into a circle. See below.
You might need to use your pliers to bend this in areas that the wire inside the stem is stiff.  Next, you will start to weave the stem over and under itself while working it in a circle. This keeps the ring intact by locking them together.  (See below)
Keep bending and working the stem around itself weaving up and over and back down again.  If the flower falls off, or if it is easier to weave this without the flower on the end, feel free to remove it temporarily.  You can add it back on later. (See below)

See that end in the upper part of the above image?  I use my pliers to bend it back into the circle.  A lot of these stems are just too stuff to only use your fingers and hand.  I then secured that end with the entire ring with a 2 inch piece of my floral tie twisted tightly around it.  I used my the wire cutter part of the pliers to trim the ends of the floral twist tie. (See below)
Now place your flower (if you removed it) back onto the stem.  If you need to, use a glue gun to secure it back in place. Find the little 'poky things' that your leaves were previously attached to and work them back onto the ring.  In some cases, I didn't like the location of that poky thing, so I just used a little of that green twisty tie and placed one where I wanted it.  Work it however you chose.  I didn't always return every leaf to the ring.  I will keep the extras for a future project.

So this is what it should like like..... Only....I am sure that I twisted that leaf around so that the nice green side shows forward with the flower. (wink)

You can add a wrap with some nice ribbon at this point, but I preferred the simplicity of the green thorny stems.  (I didn't appreciate the blister the plastic thorns  gave me on my left pointer finger.)  Moving on, slip the little ring over your candlestick, or light bulb....whatever is there......like this.....


I have ten candlesticks on this chandelier, so I repeated this 10 times.  I used an assortment of roses that were in the same collection, yet slightly different from each other.  You can keep it consistent, by using the same flower or mix it up. It's your choice.  After all it's your home.

So, here are the results! 

Pretty cool I think.  I did this entire project for 10 dollars, but I think it looks like a million bucks!  


Remember, every path is worth taking.

Hope you enjoyed this re-published blog post.  I removed these roses and replaced them with sunflowers during the summer.  I can't find the darn bag with these roses in it!!!  Wanna come over and help me look?!

-The End-

Thursday, February 16, 2012

Ponderings From The Homeless Finch Studio: Taking Time To Nurture The Soul

Many of you are women, just like me.  Many of you are mothers, just like me.  Many of you juggle more balls than what we ever thought possible, just like me.  Many of you don't take the time to nurture your souls, just like me.  We push push push forward doing for others, achieving our dreams, rescuing the unrescue-able and most definitely losing something of ourselves while juggling all of it.

This week, I have been spending time fixing, painting, feeding, and renovating my soul.  Nope, I haven't been working on a project that will be revealed anytime soon. I have been working on myself.  A project that has been long overdue for attention.  I have been taking the time to smell the flowers, reading up in some super wonderful books and magazines that feed my soul.  I have been taking a moment to enjoy a wonderful little lunch all lone while sitting on my dock enjoying the clear skies that alluded us for weeks.  I even (gasp) went and got my nails done yesterday and today (gasp) plan on shopping for a few fresh things to wear.

Have you taken the time to nurture your soul?  It is a choice you know.   If you blog, do you allow it to take over too much time in your life robbing you of the much needed down time that we all need?  Don't get me wrong, I'm not leaving my blog, just taking a rest of sorts to...well, upcycle myself....

-The End-

Tuesday, February 14, 2012

The Sweetest Days of St. Valentine Series: Heart Shaped Cinnamon Buns for My Sweeties

Happy Valentine's Day!!!

Here is what was served to my three wonderful Valentines today at breakfast...


Because ya gotta have heart.....All you really need is heart...  Happy Day People!

Thanks you to Poppies At Play for providing me this great idea.  I pinned this idea a while ago.  Did my own rendition of the idea that she shows.  Short cut....buy the canned cinnamon buns and just re-shape them. Fun, Quick Delicious!

Click this to go Straight to the Series...


I know that my Sweetest Days of St. Valentine's Series kinda fizzled here in the end.  It's been a little crazy here behind the scenes at The Homeless Finch and I just couldn't get to many of my great ideas. Oh well....maybe next year!  Thanks for sticking with me!!!  

Hey....can we be Valentine's???  
I'd like that...


-The End-

Sunday, February 12, 2012

Valentine's Day on My Pine Hutch

I have had two weeks straight of grey skies.  Getting images of my Valentine Decor on my Pine Hutch has been next to impossible.  Since Valentine's Day is Tuesday, I thought I would take the best images that I can right now and show you how cute it looks.


I love my vintage skates...but I gotta say, the jar with the vintage dice is quickly becoming one of my favorite new finds. The heavy felt garland was a recent purchase at Pier One for about 7 bucks.

Just wanted to pop in today and share a few images.

-The End-
Linking to:
Metamorphosis Monday - BNOTP

Saturday, February 11, 2012

My 25 Things

I have really enjoyed reading all the great 25 Things Blog Posts this week and decided to participate.  For those who have no idea what I am talking about...a blogger named Shaunna over at Perfectly Imperfect is hosting a linky party that requires bloggers to list 25 random things about themselves.  So here goes...

1.  I have a very difficult life outside my blog world raising two teenagers that often makes it hard to produce work and keep my blog going.  I purposely hide this from my readers because my blog is a refuge away from my daily struggles.  Here they are at their "best."
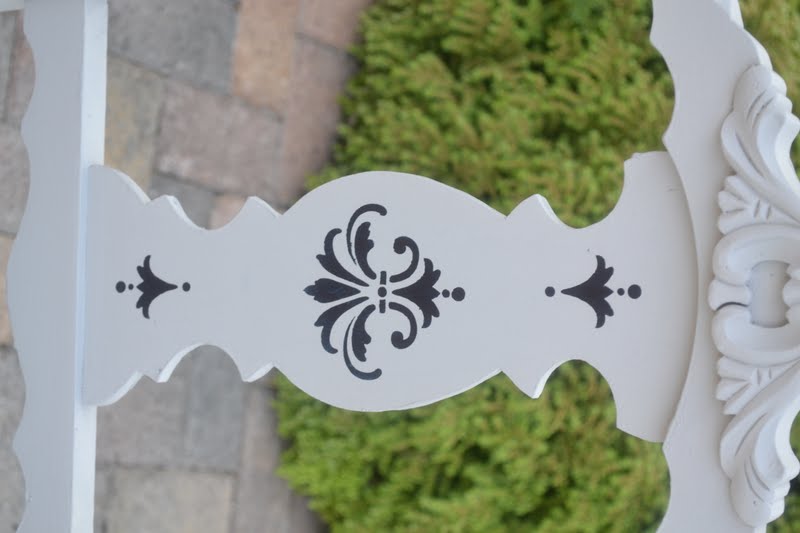

2.  I am often conflicted about what to write about because what I like to do, doesn't always jive with what the blog world wants.  I painted a Console Table last year and was so excited about it.  Not only did it get very little attention, I got a few borderline negative comments about it like, "Well...I guess this is nice, but it's not my taste."  Here is the table...


3.  I shave my eyebrows.  I don't pluck.

4.  I am a serious political junkie and am a roll-your-sleeves-up political activist in my community.  I hide this from my blog community so not to annoy anyone who doesn't agree with my politics!!

5.  I have three dogs, all Shih Tzus...Coco, Ruby and Sasha.  Coco never leaves my side and is sleeping right next to me as I type this. Here is a image of Sasha...


6.  My hubby is an avid golfer and for some reason it annoys me.  There is something about the elitist nature of it that turns me off.

7.  I am not good at taking care of myself.  This past November I had to give myself a challenge to get up to date on all my routine yearly tests.  I hadn't had any of them in over 5 years.  I completed the challenge by year's end only to find out that I have high blood pressure, 22 bi-nine cysts on my breasts and a cholesterol level that was out of control!  Can't stress it enough.....Go get your self checked out!

8.  I have a sister whom I adore.  We are both loud and opinionated and seriously close. She is an amazing fourth grade school teacher.  Together....we are The Power of Two!  Here is a picture of us at a younger time... (gotta love the 80s)

9.  I have two brothers whom I am estranged from because of drugs and alcohol.  I understand that it is their problem and not mine.  It has taken many years to come to this place.  I am at complete peace with it.

10.  Bullies have played an active role in my life and the life of my kids in making life harder.  I don't like bullies.  I think there is a real problem in our country with bullies that is not effectively being addressed.

11.  If I could live anywhere it would be Southern California.  I love it there and would move in a heartbeat if I could.  Image of our family on our last visit...


12.  I love wearing junk.  Right now I am wearing a neat necklace that is filled with vintage Cracker Jack charms.  It's like a hug.  I got it from French Hen Farm on Etsy.


13.  I was a jock in high school and played on a girls basketball team that placed second in the state.

14.  I was married young and divorced.   He was a loser and an abuser.  I got out.  Good thing because I have an amazing hubby now.

15.  We watched Rain Man last night as a family.  I love every movie Tom Cruise ever did.  Well, except for that vampire one.

16.  I loved Michael Jackson and never believed any of the allegation against him.

17.  I have a hot tub in my backyard and I love sitting in it.  Here is a shot of my daughter and a few of her friends having fun in the hot tub.


18.  My legs are hairy a lot.  I think this goes back to my point that I don't take great care of myself.

19.  I used to avidly ride my bike.  I miss it, but just don't have the time in the day.  I don't.  So don't tell me to make the time.  Because if I did make the time, there would be no blog!!

20.  My favorite part in making whole chicken dishes is sneaking the heart and the liver of the chicken.  I love them and I know they are bad for my health, but I just don't care.

21. If I have an empty water bottle or drink can in my car, I toss it out into the landscaped island in my yard.  My hubby picks it up and throws it away.  It's a fun joke between us.

22.  I am stunned when someone gives me a compliment or thanks me for something I have done.  Those things just don't come my way often.  I am a confident women. Perhaps they don't think I need those things.

23.  I love to travel and have spent a significant amount of time and money doing so.  My kids have seen more places than I had ever seen at their ages.  They took their first trip to Europe this past summer.  I plan on taking them back again soon.  I don't view travel as an option, or something someone should get around to affording.  To me, it's as vital as water.  One life, one earth.
Paris, Rome, Grand Canyon,Niagara Falls, Key West, Boston,
San Francisco, Sedona,  San Diego.
Not pictured...Alaska, Los Angeles, NYC, Tuscon,
Arizona, Blue Ridge-NC, Jamaica,
St. Thomas, Cancun, Cozumel, Cayman Islands, Haiti. 
24.  My closet is pitiful. I don't buy myself enough clothing, partly because I am cheap about that.  My husband' side of the closet is filled with stuff.  Perhaps I should do something about that.

25.  I live on a canal ten minutes from the ocean.  We have a boat that we never take out.  I prefer to go out on the dingy for rides on a sunny afternoon.  Here is an image I took on a recent dingy cruise...


Hope you enjoyed reading this as much as I enjoyed putting it together.
Gonna go link it up over at Perfectly Imperfect.

-The End-

Thursday, February 9, 2012

Blast from the Past: One Chair, One Day Reveal

Many of you who follow The Homeless Finch found me way after I started blogging.  I remember days gone by when I was working in my studio, blogging about my projects and I only had about 20 followers who were mainly friends from my 'real' world life.  Because of this, I have decided to bring to you from time to time some of my Blasts From the Past Blog Posts.  Ya know...stuff I did before you found me, but stuff I think is worthy to re-visit and highlight.  I am going to be calling these my Blast From The Past posts and on days like today, I will re-introduce them.   For those who missed this stuff....hope you enjoy!  So without further ado...

One Chair, One Day Reveal
This post was featured on three blogs.  I was kinda stunned because, quite frankly, I hated this chair but blogged about it anyway!  In fact, this chair is now sitting upside down atop something in my garage!!

Features: (you can click on the button if you'd like to see the feature.)


Yesterday, I gave myself a challenge.  I wanted to finish this chair in one day.  I was packing for a quick trip down to The Florida Keys and had to finish all the laundry in the house as well.  I also needed to get a mani/pedi so that I looked presentable to my husband's business contacts on this trip.  Somewhere in between, I wanted to redo this chair.  I didn't have a clue what I was going to do with this chair.  I had no preconceived notions or hang ups.  It's was a clean slate.  I was winging it......   I started with this chair that I got for 2 bucks at a yard sale last weekend.
"Before"


After dropping my daughter at school, I headed to Joann's Fabrics.  I had rummaged through my fabric piles and nothing inspired me.  I wanted something with some personality.  After grabbing an awesome 40% coupon at the door, I headed back to the decorator fabrics and found this awesome fabric.  I noticed a nice light grey color in the pattern and immediately thought of Annie Sloan's Paris Grey paint.  I happen to have a pint of this paint. The idea of using it on this project excites me because the process of using this paint allows me to skip the priming stage.  Just what I needed for a one day project! Yeah!  I also decided to pick up a new foam cushion.  Before I had left the house I had taken the cover off and found this disgusting chair cover, and was not going to re-use it.
Gross.
On the way home, I stopped back by my daughter's school.  Over half of her class were not in attendance because of some skip school rumor. She had been texting me non-stop.  The guidance counselor confirmed her dilemma, released her and she jumped in the car with me.  I have to admit that it ran through my mind that getting the chair done would be easier without the extra pick up in the mid-afternoon!!  Besides, she is one heck of a laundry captain and I knew she would be helping!!!  I know, bad mommy.....

Annie Sloan's Chalk Paint requires very little prep, so I got right to work painting.  This chair had been neglected for so many years, it devoured the paint.
I was super pleased. It was already worlds better.  Between layers of paint, I push through the laundry and started on the chair cushion.  It really gave me a run for my money.  These little chair covers are the easiest thing to do.  All it takes is a pair of scissors and a staple gun. But, this one was teaching me a lesson!  The thicker foam cushion made the folding at the corners challenging.
I kept eyeing the center slat on the chair knowing that I wanted to add an accent.  I placed the cushion temporarily in place and decided to add a stencil detail in the same deep rich blue in the fabric.  I have a huge selection of stencils that I have collected over the years, I knew that I could find one with a similar 'feel' as the pattern in the fabric. 

Out came my acrylic paints.  (I am always thankful at this point for my art degree. Oh!!! All the hours spent perfecting mixing paint colors does actually pay off!)  I matched the color mixing two shades, taped on the stencil and went to town.
  
 I also decided to add a little detail to the top of the chair legs.
I lightly sanded the chalky, yummy surface of the chair.  I love this paint because it just melts under the sanding block.  All the drippy and gloppy places easily sand away to a smooth surface. I brushed some of the paint dust lightly over the surface of the stenciled areas to soften their intensity. 

So I got to this stage and stopped.  Sorry that the image is a little dark, the sun was going down. Long day.  I just wasn't satisfied with it.  It didn't feel finished, plus there were some super cool markings on this chair and they are just not visible in this state.  I knew I needed to add some dark accents....but what?

I decided to take a huge risk and mix up a wash out of my dark blue acrylics.  I added a ton of water to it, got a junky brush out and a few rags with extra water.  I thought, "What the heck!  I got nothing to lose."  I knew that I would be posting the results on my blog and I decided to let the chips fall where they may. This Annie Sloan's paint has a seriously powdery surface and I didn't know how the wash was going to 'take' to that surface.

 I just liberally brushed the watered down paint onto the chair, working in small sections. 

I let it set up a little bit and came back with a soft wet rag and wiped off the excess, except in the crevices.  I followed with just a damp cloth and buffed the surface.
It was at this point that I started to get excited because all those bubbly, yucky, drippy wonderful paint marks were being showcased! Yeah!  It was definitely changing the overall hue of the chair to blue, but I was okay with it. 
Details of the bubbles, brush strokes highlighted
by the glazing.

I finished up the entire chair, buffing the surface one more time rubbing more blue off in certain areas to let the grey show through.  I think it is done and here are the results with the "before" and "after" images.....


-Before-


-After-

 
-Before-
  
-After-


-Before-
-After-
I am super happy with the results now that I took the risk and used the blue wash.  It was great marriage with the chalk paint.  Here are some more images.


I did get the huge piles of laundry done, with the help of my daughter who was playing hookie.  The packing got done late last night and I probably forgot to include something important in the overnight bag due to my sleepiness.  Oh well....  One thing I didn't accomplish....Dun Dun Dunnnnnnnnn.......the seriously needed mani/pedi.  Normally I wouldn't care, but this trip is a husband work related excursion. Yep.  I'm in trouble.  We drive out of here in just a few hours.....  I gotta run and get these tootsies done and get this leftover Paris Grey paint and blue acrylic wash off my skin!  Arg!

-The End-