A Pot For The Poinsettia: Making A Nice Gift Special
Are you like me? I never go to a holiday party empty handed. Nope never. I always like to take something...like a poinsettia.
Poinsettias are nice hostess gifts...but are they special? They can be, if you raise your game. Yep...Raise Your Game People!!! It's the holidays for gosh darn sakes!! For very little money, you can turn your poinsettia gift from nice to special. Here's how...
Take that darn, boring, and quite frankly tacky shiny thing off the bottom and replace it with a size appropriate clay pot!! The ones I buy at Lowes are only about 4 bucks, and boy what an impact they can make. You can keep it very simple and just put a big, gorgeous festive bow around the clay pot. That alone is an improvement and the hostess will have a nice pot to use later. But, If you have a little more time and the particular hostess is important to you, why not take it to the next level and decorate the pot?
The sky is the limit. You can paint, decoupage paper or fabric, attach all sorts of embellishments onto the surface. Here are a few things that I tried out....
Using hot glue, I attached a few 'chicklet' tiles in a funky Christmas Tree pattern.
I got these tiles (discontinued) for free thanks to my friend Leigh, who is an interior designer!! Thanks Leigh!
I then took jute and randomly worked it around each tile.
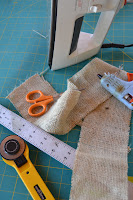
 The addition of the jute gave the pot a rustic feel so I decided to trim the upper rim with burlap. I cut out a piece that was twice the width of the rim, so I could fold it over. Just eyeballing it, I could tell one strip would be too chintzy. I gave the burlap a quick press and used a thin bead of hot glue to 'sew' the ends together.

I attached this burlap strip to the rim of the pot with hot glue, making sure to neatly join and fold over the long end of the strip on the back of the pot.
The tree needed a star, so washer did the trick for me and stood in for the tree topper.
Here are the results.

It was time for a little something silver. Silver is captivating every magazine cover this season!
 I started by spraying the pot with Valspar Brilliant Metal Silver spray paint. I gathered up a few silvery pics, snowflakes, jingle bells and such that I have picked up at stores like AC Moore, The Dollar Tree and Joanns fabrics.
I started with a few glittery leaves ...
I then worked in a silver glitter snowflake and a jingle bell, finishing it off the motif with a wired ribbon bow. Here is the finished product...
My camera doesn't pick up the super sparkles of this pot. It really glistens. Almost blinding!
On the next pot, I decided to use a crocheted vintage Christmas doily that I picked up at an estate-style yard sale this past summer. Don't forget to use some of those special little treasures on these pots if you think the hostess would appreciate their significance. I then chose a traditional poinsettia fabric for the rim. While I was eyeballing the two together, I decided that I wanted to paint the pot, although it could have been left alone.
 Out came the Annie Sloan's Chalk Paint in Old White. I covered the pot with two coats. While the paint was drying, I worked on the fabric accent on the rim. I ripped a 3 1/2 inch strip of fabric, folded the edges with the wrong sides out and ran a seam of stitches 1/4 inches from the edge. (Yes, I know...it's a sewing machine and many of you cringe at the mention. If you don't want to use a machine, just rip the strips to fit. I just wanted a more polished look.)
I lightly sanded the pot, allowing a little bit of the clay pot to show through. Turning the poinsettia fabric tube right side out and giving it a quick press, I hot glued it seam side down on the pot rim. I then hot glued the doily onto the front of the pot. Here are the results...
This is a sweet little pot just as it stands. However, you could ( and I might) add a few embellishments on the doily, like buttons and such just to give it a more finished look.
I have a few more pots to make, but I simple ran out of time in the day to complete them. That's what happens when you have teenagers with afternoon activities!
 I have one that I will be covering with fabric scraps using Mod Podge and another with strips of decorative papers. It is endless how to work this project. I know many of my readers love the look of decor using house numbers. I think that would look great too!
 I am hoping this gives you some inspiration to take in your own direction. I mean, come on!! If your going to give the gift of a poinsettia...why not up your game?!! Make it special...make it a real gift.
Don't forget to come back tomorrow for my
Day 3
of
25 Days of Christmas and Holiday Ideas and Gifts Series!!


14 comments:
LOVE LOVE LOVE this idea Lesley! I never leave mine in the wrapping it comes in. Have a great weekend, Martina
Look at you go! I love the silver one.
Looks like I missed a lot! Congrats on breaking 200! Will post you button tomorrow! Love the crafts!
What a great idea! I especially love the silver pot with all it's blinding sparkliness. You can find similar 1 in. square glass tiles at Hobby Lobby by the mosaic and stained glass section. I must hurry now to get mine!
Deb
those are so pretty! i love poinsettias but i never buy them for myself because i feel like it is a guilty indulgence- they make wonderful gifts!
You are just tooooo talented. Ok I like the Poinsetta/doily one the best. I never think to use things like that. Thanks for the inspiration.
Smiles,
Debbie
You are a creative genius!
Love the white one especially. So pretty!
Sweet! Great ideas and tutorial.
Great ideas Lesley - I love them all!
I really like the silver pot - it's so pretty!!
Rachel
adventuresofadiymom.blogspot.com
I planned to buy a poinsettia tomorrow, but I never thought about decorating a pot to put it in. Thanks for all the good ideas.
Great idea!! I love it!! The silver one is my favorite. I love the spiky one, too.
Ruth
I love the bell on the one sliver pot.
lisa
Post a Comment