Thursday, February 9, 2012

Blast from the Past: One Chair, One Day Reveal

Many of you who follow The Homeless Finch found me way after I started blogging.  I remember days gone by when I was working in my studio, blogging about my projects and I only had about 20 followers who were mainly friends from my 'real' world life.  Because of this, I have decided to bring to you from time to time some of my Blasts From the Past Blog Posts.  Ya know...stuff I did before you found me, but stuff I think is worthy to re-visit and highlight.  I am going to be calling these my Blast From The Past posts and on days like today, I will re-introduce them.   For those who missed this stuff....hope you enjoy!  So without further ado...

One Chair, One Day Reveal
This post was featured on three blogs.  I was kinda stunned because, quite frankly, I hated this chair but blogged about it anyway!  In fact, this chair is now sitting upside down atop something in my garage!!

Features: (you can click on the button if you'd like to see the feature.)


Yesterday, I gave myself a challenge.  I wanted to finish this chair in one day.  I was packing for a quick trip down to The Florida Keys and had to finish all the laundry in the house as well.  I also needed to get a mani/pedi so that I looked presentable to my husband's business contacts on this trip.  Somewhere in between, I wanted to redo this chair.  I didn't have a clue what I was going to do with this chair.  I had no preconceived notions or hang ups.  It's was a clean slate.  I was winging it......   I started with this chair that I got for 2 bucks at a yard sale last weekend.
"Before"


After dropping my daughter at school, I headed to Joann's Fabrics.  I had rummaged through my fabric piles and nothing inspired me.  I wanted something with some personality.  After grabbing an awesome 40% coupon at the door, I headed back to the decorator fabrics and found this awesome fabric.  I noticed a nice light grey color in the pattern and immediately thought of Annie Sloan's Paris Grey paint.  I happen to have a pint of this paint. The idea of using it on this project excites me because the process of using this paint allows me to skip the priming stage.  Just what I needed for a one day project! Yeah!  I also decided to pick up a new foam cushion.  Before I had left the house I had taken the cover off and found this disgusting chair cover, and was not going to re-use it.
Gross.
On the way home, I stopped back by my daughter's school.  Over half of her class were not in attendance because of some skip school rumor. She had been texting me non-stop.  The guidance counselor confirmed her dilemma, released her and she jumped in the car with me.  I have to admit that it ran through my mind that getting the chair done would be easier without the extra pick up in the mid-afternoon!!  Besides, she is one heck of a laundry captain and I knew she would be helping!!!  I know, bad mommy.....

Annie Sloan's Chalk Paint requires very little prep, so I got right to work painting.  This chair had been neglected for so many years, it devoured the paint.
I was super pleased. It was already worlds better.  Between layers of paint, I push through the laundry and started on the chair cushion.  It really gave me a run for my money.  These little chair covers are the easiest thing to do.  All it takes is a pair of scissors and a staple gun. But, this one was teaching me a lesson!  The thicker foam cushion made the folding at the corners challenging.
I kept eyeing the center slat on the chair knowing that I wanted to add an accent.  I placed the cushion temporarily in place and decided to add a stencil detail in the same deep rich blue in the fabric.  I have a huge selection of stencils that I have collected over the years, I knew that I could find one with a similar 'feel' as the pattern in the fabric. 

Out came my acrylic paints.  (I am always thankful at this point for my art degree. Oh!!! All the hours spent perfecting mixing paint colors does actually pay off!)  I matched the color mixing two shades, taped on the stencil and went to town.
  
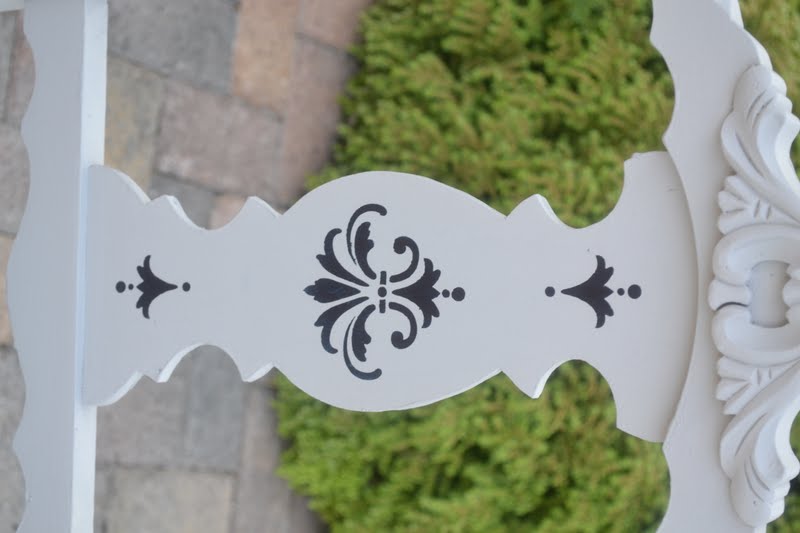
 I also decided to add a little detail to the top of the chair legs.
I lightly sanded the chalky, yummy surface of the chair.  I love this paint because it just melts under the sanding block.  All the drippy and gloppy places easily sand away to a smooth surface. I brushed some of the paint dust lightly over the surface of the stenciled areas to soften their intensity. 

So I got to this stage and stopped.  Sorry that the image is a little dark, the sun was going down. Long day.  I just wasn't satisfied with it.  It didn't feel finished, plus there were some super cool markings on this chair and they are just not visible in this state.  I knew I needed to add some dark accents....but what?

I decided to take a huge risk and mix up a wash out of my dark blue acrylics.  I added a ton of water to it, got a junky brush out and a few rags with extra water.  I thought, "What the heck!  I got nothing to lose."  I knew that I would be posting the results on my blog and I decided to let the chips fall where they may. This Annie Sloan's paint has a seriously powdery surface and I didn't know how the wash was going to 'take' to that surface.

 I just liberally brushed the watered down paint onto the chair, working in small sections. 

I let it set up a little bit and came back with a soft wet rag and wiped off the excess, except in the crevices.  I followed with just a damp cloth and buffed the surface.
It was at this point that I started to get excited because all those bubbly, yucky, drippy wonderful paint marks were being showcased! Yeah!  It was definitely changing the overall hue of the chair to blue, but I was okay with it. 
Details of the bubbles, brush strokes highlighted
by the glazing.

I finished up the entire chair, buffing the surface one more time rubbing more blue off in certain areas to let the grey show through.  I think it is done and here are the results with the "before" and "after" images.....


-Before-


-After-

 
-Before-
  
-After-


-Before-
-After-
I am super happy with the results now that I took the risk and used the blue wash.  It was great marriage with the chalk paint.  Here are some more images.


I did get the huge piles of laundry done, with the help of my daughter who was playing hookie.  The packing got done late last night and I probably forgot to include something important in the overnight bag due to my sleepiness.  Oh well....  One thing I didn't accomplish....Dun Dun Dunnnnnnnnn.......the seriously needed mani/pedi.  Normally I wouldn't care, but this trip is a husband work related excursion. Yep.  I'm in trouble.  We drive out of here in just a few hours.....  I gotta run and get these tootsies done and get this leftover Paris Grey paint and blue acrylic wash off my skin!  Arg!

-The End-

Monday, February 6, 2012

Ponderings from The Homeless Finch Studio: Rain Rain Go Away


Anyone out there feel like I do today?  The weather out my studio window is dreary. Non-stop drizzles and rain showers.We've had grey skies for several days in a row without a break.  My thoughts are a mirror image of what I see as a peer out my window.  Makes me ponder about the creative process and how creative people can find inspiration to create even under dreary circumstances.  Many of my friends in colder regions have written about their inability to work on their furniture projects because of the bitter cold, driving them inside for warmer pursuits like needlework and small crafty projects.

My issues run a little deeper.  In March, I will celebrate my one year Blog-versary.  I am excited about the prospect of celebrating such an accomplishment.  But truthfully, I am plagued with thoughts of frustration this morning.  Crazy right?!  Let me whine a moment explain why.  I can't seem to recon my thoughts about "why" I am doing this with what I feel should be the goals based on the time I invest in The Homeless Finch.  Plus, the artist inside me is disappointed in myself for not just understanding this pursuit as I should be...as a road traveled that continues to inform my work, my life and fuels my days with purpose...with accountability.  Without the blog, I am sure that I would be so back on that road I was on where I couldn't seem to jump start myself.  The 'pressure' of reporting in has be a huge motivator for me and this was something that I needed dearly.

So why the dreary mood?  Is it the weather?  Am I just tired from life and balancing it all...raising teenagers and all the challenges, trying to be the best wife on the planet and a good friend to those around me?  Am I needing a moment to stop and re-evaluate where I am, where I am going and what my goals are based on the almost year-long blogging ride I've been on?  Do I just need a nap today? (sly smile)  Maybe, yes to all the above.  Or maybe it is something entirely different.  

Do you ever have days, weeks, months like this?  Do you ever wonder why you do what you do?  Do you ever question your motivations?  If you blog, do you ever get down on yourself when you see other blogs grow to huge numbers, while you grind it out on the ground everyday, every week only adding a few followers every few weeks? When you link your posts to parties, are you like me so tired that you can hardly pull off this simple task without straining your tired yes to see how your thumbnail looks on that linky list?  Do you, or for that matter should I, care about followers and stats and comments and features?  


It might be re-evaluation time.  Don't ya think?!! Do you think about these things too?  Let me know your thoughts.  I'm waiting right here in my dreary little rain puddle, wondering if someone out there feels my soggy little pain. - If I hadn't made the commitment to never use text style writing my on my blog an LOL would have been inserted right here because sometimes....you just gotta laugh and say, Rain rain go away come again another day...


Photos taken this morning just outside my studio door.


-The End-

Thursday, February 2, 2012

The Sweetest Days of St. Valentine Series: All My Love Valentine Wreath


I know, I know.  Just from the title I have all you guys singing Led Zeppelin. Right?!  No?!  What?!!  How is that possible??  Well, for some of you who know what I am talking about read on.  For those who don't, what planet have you been living on?  

Today, I made a wreath for my front door.  I wanted to depart from the one I have used the past few years for two reasons. One, it's tired.  Two, it's tired. (wink)  I thought of a lot of options, but in the end decided to put this one together using fabric scraps.  

Materials
Wreath Form - I used a white grapevine
Assorted Fabric Scraps - Mostly Reds, including burlap
Assorted Buttons for accents 
Jute
Scissors, Regular and Pinking Shears
Hot Glue Gun and Glue Sticks
Letters for a Message 
Quilter's Pins

If you have been reading The Homeless Finch for a while, you know that I have an awesome friend who is a decorator.  Whenever the firm clears out their fabric samples, she gives them to me!  Better me than the trash dump!  Yeah Me!  I took out an assortment of those fabric sample books that had red shades.  You can use whatever fabric, just remember that the largest piece to make the flowers needs to be about 4 X 4 inches square.  

I started with a basic wreath form that I have had laying around.  I covered it with strips of burlap and topped it off with a gathered strip of gingham fabric that I put a rough satin stitch  along the edges.  


I then cut three circles out of my fabric, one large, medium and small for the center of the each flower.  I took the two largest sized circles and put a running stitch around the middle so I could gather the center.  I then took each circle and hot glued them together working from large to small.  I then chose a random button from my stash to finish off the flower.


After completing each flower, I worked it onto the wreath affixing it with hot glue. A few of them, I used a quilter's pin to secure them and then hot glue.  The pins helped me figure out as I went where I wanted to place the flowers giving me the flexibility to move them before using the hot glue.  

I made the leaves by cutting out 4 x 4 inch squares of a green and creme ticking fabric, grabbing the middle like a handkerchief and tying off the ends with a string from the burlap.  

 I realized at this point, that I needed to bring more of the black and white gingham fabric around the wreath.  I ripped several strips of gingham fabric and finished off the edges on my sewing machine using a red thread satin stitch.  You don't have to do this, I was just in the mood to finish the edges.

I took the scraps of fabric that I had leftover from the flowers and made ten tiny pennants and strung them on a piece of jute using hot glue.  I popped onto my Silhouette Cameo Software and made the letters for the "All My Love" message.  I then sent it to my Silhouette which happily cut them out for me on creme colored scrapbook paper.  You can use your own letters, chipboard letter or whatever you chose. 
Here are the results... 


AND....some detail images....


AND...a little vignette...


Stay tuned for another great project in my series 
The Sweetest Days of St. Valentine!  

If you click this button, it will 
take you to the entire series.

Oh! By the way....if you have not idea why I referenced Led Zeppelin at the beginning of this post...perhaps this might help.


-The End-

Linking this post to: