Pages

Monday, January 30, 2012

A Transformed Vintage Mantel Find A Home In My Master Bedroom


Remember the mantel that I revealed in "How To:Vintage Mantel Gets A Makeover" last week?  Was that two weeks ago? Oh well, whatever...I revealed it.  (throat clearing noise)  Well, I have finished installing it to the wall in my Master Bedroom and have thrown together the beginnings of a vignette.  Still working out the kinks, but I wanted to show it to you as it stands now.

Here is the before and after...but of course before installation.  
My Master Bedroom is not outside in my backyard!!!  


I bolted it to the wall, like a good little ole DIYer using two "L" brackets and wood screws that I tapped straight into the bead-board on the wall, making sure to touch up the brackets with leftover paint from when we painted the bead-board.  Here is the mantel sitting on the wall to the right of a built-in, recessed television cabinet.


I found the neat enameled tub with stand a few years back at an outdoor flea market.  I love keeping my extra throw blankets piled up in it.  The little vintage suitcase has been altered with an antique finish, including a few french style decoupaged motifs and is filled with a few things I don't want laying around.                                                                                                                                          The top of the mantel has a variety of treasures including a neat pair of babies shoes, a vintage door knob, an iron dove finial from a antique iron bed that is sitting off to the right beyond the image, my great grandmother's white chamber pot and a self-portrait sculpture I made a few years back out of terracotta.  I'm holding a blue bird in my hands. Always rescuing something or someone.
I plan on taking a little more time to dress this mantel. I am thinking the addition of some dried hydrangea flowers in the chamber pot would look pretty.   I would also like to paint a 3 by 3 foot abstract landscape for the wall above it.  But for now, it is just okay with me.  
-The End-
This post was featured at:
Linking this to:


Sunday, January 29, 2012

The Sweetest Days of St. Valentine Series: Velvet Heart Place Card Holder

Are you planning a Valentine's Day Party?  I have been to a few over the years and they can be a lot of fun.  Today, I am showing you a neat idea for a Place Card Holder that can also be paired as a Take Away Gift.   My sis thinks they would also be fun for a Valentine Day Wedding Favor.  The velvet heart on a stick and the clear glass pot (actually a votive candle holder) can be purchased at your local Dollar Tree.


This is a pretty straight forward project, so I won't bore you with a ton of images.  Here is a basic materials list and instructions.

Materials
Mini Clear Glass Pot (Dollar Store,votive holder)
Velvet Heart on a Stick (Dollar Store, 8 per pack)
Tiny piece of Styrofoam
Green Felt
A package of Conversation Hearts
Papers for the name tag 
Scissors (straight and scalloped)
glue stick, hot glue 
green thread
Sewing Needle or Sewing Machine

1.  Cut a small piece of styrofoam to fit into the pot. You want to make sure there is enough room around it to fit conversation hearts between the styrofoam and the sides of the glass pot.  Hot glue it to the bottom.

2.  Take one velvet heart on a stick, clip off about an inch or two from the bottom of the stick, and stab it into the center of the styrofoam.  I clipped it down because I thought the height looked better.  

3.  Cut two leaf shapes out of green felt.  Either stitch the green veins onto the leaf using a thread and needle or pop on your sewing machine, fitted with green thread.  I used a light green so that it would show better against the kelly green felt. I ran a narrow satin stitch to form the veins.  If you are hand sewing, you might want to consider using embroidery floss.  

4.  Hot glue the leaves onto the stick overlapping them and slanting them slightly upward.  

5.  Make the Name tag. My tag has three layers.  I used a clipping from an old dictionary for the base.  I coated the dictionary paper with Mod Podge to give it a slight shine.  The middle layer is just a plan piece of red scrapbook paper.  The name was printed out from my computer and cut out using a scallop edge scissor.  I used a glue stick to adhere the layers of paper to each other and a dollop of hot glue to affix the tag to the glass pot.

6.  Fill the pot with conversation hearts making sure to cover up the styrofoam. 

Quick and easy.  This can be replicated in large quantities at a very low price and in very little time.  If you look closer at the photo, I have included one of my paper flower rings on the rim of the pot.  If I were to throw a party, I might include something like that for my girlfriends.  Just an extra idea.  

Hope you liked this fun little idea.  It's sweet...in more ways than one!


Stay tuned for another great project in my series 

The Sweetest Days of St. Valentine!  


Saturday, January 28, 2012

Ponderings from The Homeless Finch Studio: A Tempting Thought, Your Opinion Wanted, A Surprise and a Feature

Lately, I have been messing around in my studio making all sorts of jewelry for myself.  I haven't really blogged about it because, well, this stuff is for me.  Why does that matter?  Well, I don't want the concept of having to write a blog post about it to change the way in which I am creating this stuff.  Plus, I am trying,  I mean really trying, to stick to my knitting.  Being a right brain crazy person, brings with it challenges in the staying focused category. I have a tendency to go where my Muse beckons me.  Make sense?  

Last week, I pulled out a leftover piece of fabric from my sister's Swivel Chair for a Teacher Project from last summer along with an assortment of beads and stuff and created this bracelet for myself.

Even though it is not a piece of furniture or a home decor project, it has me written all over it.  It is filled with recycled, upcycled and recreated elements.  


I like this bracelet and I don't really care if anyone else does.  I showed it to my sister and to Deneen at dreamingincolor. Deneen thinks that I should make these and open up an Etsy Shop.  Well, I have an Etsy shop....problem is, it's empty.  It's always been empty.  My sis had an Etsy Shop a few years back and the thought of one...well, how do I put this? Scares me.  There I said it. Yep....I said it.

Today, I was messing around with an idea that I had to use paper roses on a ring.  The look isn't for everyone, but I like what I came up with...

Please ignore the ugly, wrinkly skin. 
I know that everyone who has an Etsy business works super hard maintaining their shops.  I just don't know if that is the direction I want to go with this stuff.  But it is a tempting thought.  I don't think I would limit myself to just the jewelry that I came up with, I might also include things like the Crazy LOVE Letter Sign I made this past week too.

So what do you guys think?  To Etsy or not to Etsy, that is the question.  I know that some of you have shops.  Is it worth the time and effort?  If so, what is your best advice?  Can't wait to hear back from you.

Before I leave today, I wanted to say THANK YOU to Deb over at Twice Nice for the amazingly lovely post she wrote yesterday.  It was one of those surprises that come out of nowhere...I never get those.  What a nice thing to uplift someone.  If you wanna read what she wrote about me and see her totally awesome lamp revamp, click here.

I also want to thank Gail at My Re-Purposed Life for featuring, she calls it Catch As Catch Can," my Mantel Makeover.
Photobucket


It's always such a wonderful surprise when someone likes what I do!  Puts a smile on my face!

The Homeless FinchI have a few more projects almost completed in my The Sweetest Days of Valentines Series. I also have my hands in a few other furniture related things too.  I'll be bringing them to you in the next few days!

Thanks for the support....and let me know what you think, good and bad, about Etsy! K?!

-The End-

Thursday, January 26, 2012

The Sweetest Days of St. Valentine Series: Re-Cycled Valentine Heart Pillow


The pink is the pillow getting ready for the makeover.
This past weekend, two of my neighbors were having yard sales.  I picked up quite a few things for pennies. I saw a sweet little pink pillow and immediately thought Valentine's Day.  The pillow had tiny, subtle dark pink and white stripes and a few gathered pieces.  But I thought it could use more and I knew I could add a little pizazz of my own.


I am always looking for throw pillows at neighbor's yard sales, because I know whether the pillow has been in a pet free environment.  This matters to me because my teenage son has horrible allergies.  Even if I throw a pillow cover in the wash, the pillow form itself gets to him if it's been in a house with a cat.


Today, I sat down for a few minutes to spruce up this pillow.  Remember these from my 25 Days of Christmas and Holiday Series?


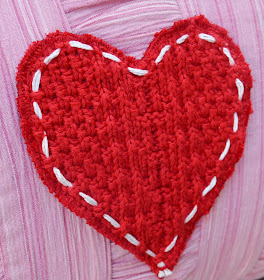
Well, I still have some red sweater leftover and, you guessed it, I decided to use it on this project. I thought it would make a wonderfully cozy looking bright red heart for the front of the pillow.   I took the leftovers out along with my spare fabric from my Kitchen Cabinet Becomes an Open Shelf Makeover.  Remember that post?  Woodsy is still sitting on that shelf.  He loves it there next to Martha Stewart's Baking Handbook.

Anyhoo...I knew that since I was going to be cutting a shape out of the sweater, it was going to need some type of backing to stabilize it.  The black checked fabric that I used in the open cabinet still had some Mod Podge dried to the back, but this didn' deter me. I knew it would work regardless.


I first cut out a paper heart the size I wanted.  I faced the fabric and the sweater wrong sides together and before cutting the fabrics, I stitched a heart using the paper heart as my guide.

After the heart was stitched, I cut it out.  I did it this way because I knew it would be easier since the sweater material, now stabilized by the checked fabric, would then be able to keep it's shape.


I then used a satin stitch on the outer edge of the applique to seal off the fuzzy sweater edges.  I added a little homespun running stitch along the edge of the heart using three strands of white embroidery floss.


I then just simply whip stitched the heart onto the front of the pillow in three places using a red thread. Three snips after Valentine's Day and I can do something else.

Here is my simple, Recycled Valentine Heart Pillow


Do you look for this type of thing when you are shopping at your thrift shops or yard sales?  Do you ever notice that the plain pillows are always the ones leftover on sale at your favorite stores?  Don't overlook this stuff.  For pennies, you can create something that is uniquely yours.

After finishing taking images of the pillow out in my backyard, I placed the pillow on my wicker chair in my studio.  My Coco hasn't moved from this spot.  Seems she approves too!


Gotta love the little furbabies.  They've got great taste!

Stay tuned for another great project in my series 
The Sweetest Days of St. Valentine!  


-The End-
Linking this post to:
                   

Wednesday, January 25, 2012

The Sweetest Days of St. Valentine Series: Crazy Love Collage Letter Sign

Love is a curious thing.  In it's best form, it's all mixed up and crazy. It's all undecided, yet glues us together.  I was wondering how I was going to illustrate my feelings about this crazy word that means so many different things to so many different people.  As I pondered this, I sat and doodled the word using different font styles for each letter.  Why not create a little work of art out of the word love?  Why not create a little "Crazy Love" right here in my studio?!

I went into the project with a few things in mind.  I would use a piece of an old fence I dragged home from a neighbor's trash heap.  I knew I wanted to use my Silhouette Cameo on this project.  I also knew that I wanted to present something that reflected my feelings about the curious, mixed up word, Love.

I started by working out a few different layouts of the letters L O V E on my Silhouette software.  I chose one grouping and sent it to the cutter.  Here is what I got.

I decided to use different combinations of color, texture and style for each letter.  Here were the different things I chose...

 L 

Using the dull side of aluminum foil, I covered the "L" securing the foil to the letter with scotch tape on the back. 
 O 

I lifted a stock photo of conversation hearts, blurred the image out slightly and  printed it out on photo paper. I cut it into a rectangle to form a background of the "O."  I then painted the "O" with Folk Art Craft Paint in Light Blue#402 and used a glue stick to attach it to the center of the photo.
 V 

Using a page out of an old dictionary that shows the meaning of the words love through love game, I cut a rectangle out with a scallop scissor edge to create an interesting border to the backdrop for the letter "V."  I then sponged the letter "V" directly onto the dictionary paper.  This image is a little deceiving because you see the cut out letter "V," but I used the paper it was cut out of as a stencil.  
 E 
Using the cut out "E" and a red tweed fabric, I 'upholstered' the letter using hot glue.   I just love these fabric sample books that my designer friend downloaded on me.  They are so handy.
Before assembling the letters into place on my old fence board, I fashioned a hanger for the sign out of red wire and screwed it down to the board.

Now it was time to assemble the letters.  I wanted them to be at varying levels on the board.  So I came up with a few little tricks to give them a lift. 
I used a leftover piece of wood and glued the "L" on top.
I wanted the "O" elevated, but not a high as the "L."
So I looked around and found a few stick on chair leg
glides and glue them between the photo and the board.

The dictionary paper that the "V" was stamped onto was glued directly to the board using Mod Podge.  The "E" already had a little lift due to the tucked under edges of the fabric.  I simply hot glued the "E" down to the board.

I finished off the wire with a little bow made from a piece of yarn.  Here are the results...


I am so pleased with the results. I have taken a few images of the sign capturing just each letter. I like the way the images stand alone and am thinking I might use them in another project down the road.  Who knows.  

That's how I spell...


This project could be pulled off using so many different materials and such that you already have in your supplies. If you don't have re-claimed fence wood, why not use a piece of foam core board or cardboard?  Try putting your own spin on it.  


Hope you enjoyed this little walk through my process of creating this Crazy Love Collage Letter Sign.  If you are new to The Homeless Finch, welcome.  Please take a few minutes, look around at my other fun projects. Oh! and....don't forget to consider becoming a new follower! 

Stay tuned for another great project in my series 
The Sweetest Days of St. Valentine!  


-The End-
This post was FEATURED at:
Sew Woodsy

Photobucket

Linking this post to: