Pages

Tuesday, May 31, 2011

Covered in White

Robert Rauschenberg: White Paintings
Guggenheim, NY
Have you ever considered how many colors are out there in the universe?  Can you imagine?  It is an endless array of tones, shades, reflectiveness.  As an artist and painter, I am overwhelm at times over the countless choices as my brush prepares to hit the canvas.  I once did a series of paintings using only white, black and greys.  It sounds colorless, doesn't it?  But, it is not!  Even with just that type of palette, the possibilities are endless!  Even painter, Mark Rothko who is known more for his bright color-block painting dabbled in a little black grey and white! 
Mark Rothko Portrait
The Shape of Jazz To Come #21
With shades of white and grey on my mind, my painter, Ravi, came by today to discuss the master bedroom and bath project.  He helped me pick out three possible colors for the master bedroom and bath.  I say "colors," but most of you might not consider Sherwin Williams shades called Natural Choice, Pearly White and Incredible White actual colors.  
SW7011 Natural Choice
Natural Choice

SW7009 Pearly White
Pearly White

SW7028 Incredible White
Incredible White


This is Before image of the room...dark.

Now, I am not sure how these color swatches are 'reading' on your monitor, but they are very very different. Well, that is.....if you are a weirdo like me, you notice!  Once they are on a wall, the undertones will really make a showing as they play off of the trim and accents in the room.  Light will play a serious role, as it usually does, in how they present themselves.  This is one of my primary concerns because our bedroom does not get very much natural light.  I will be picking up the sample quarts in a little while.  I usually take a few days making a decision about a wall color because I like to live with my swatches on all the walls to see how the color changes during the day.  I realize that this might seem ridiculous, but I believe that the walls are going to make or break this project. 

I am also working diligently on the Hall Tree that sits at the entry to the bedroom just at the top of a stairway.  Below is a before image.  The walls in this room are about to change, as I just mentioned, and this Hall Tree is in the process of a makeover as well.  
-Before-
I have been using Annie Sloan's Chalk Paint on many of my projects lately.  On this one, I have decided to use the Paris Gray as the primer, but I will not use the chalk paint for the top layers.  I have decided this for many reasons.  One, the chalk paint is horribly dusty in the sanding phase. This Hall Tree is just too darn heavy to take out and in repeatedly.  Secondly, because the shade that I want isn't really offered.  Thirdly, I want to antique this piece.  The chalk paint unrelentingly sucks up the stain, not allowing me to wipe it clean.  I want white, not mud! 

Why not just use a regular primer you ask?  (Come on, you know you asked.) I realize that this paint is super pricey, but  I do not like this shade, Paris Grey at all. Yuck! Not for me!  So why not just get some use out of it as a primer?  I can cover it up with something pretty.  Since, I want this piece to be white,  I have decided to paint it Sherwin William's Alabaster.   

Here it is after the priming stage.  Oh.....yucky Paris Grey.....how I long to cover you up!
I need to also pick up some new hardware for this piece.  I am thinking of going with something with a silver type finish.  I will then attempt to match it and spray the hooks in the same finish before returning them to their original places. 

As you can see, I have a lot to accomplish.  If I can get decent images, I will post them showing the different wall color swatches. If you have a great 'go to' white or neutral wall color, please don't hesitate to let me know!   For now, off to pick up my samples and try and find new hardware!  Well......after I clean these glops of grey paint off my arms.....  Wish me luck! 

-The End- 

Monday, May 30, 2011

Blurry Eyes and a Little Memorial Day Round Up

Okay.  So, I am just gonna put it out there.  I'm blown.  I'm tired. I can't see straight.  What's an old gal like me thinking sitting up until 2 AM in the morning working on my blog template?  My scratchy eyes are wanting to know.....
If you are reading this, you have certainly seen what I have done to the design of The Homeless Finch.  How it got here, well, I don't know.  I just got so darn sick of that Blogger Watermark Template and wanted something a little different.  Before, I knew it.....there was no turning back.  If you know anything about what this is all suppose to look like, you realize that I probably should have stayed up until 4 AM, or perhaps never gone to bed!  But this is where it is for the moment..... what little I can see through my sleepy eyes.

For those of you who might wonder, I used the free services over at Shabby Blogs and merge it with FotoFlexer.  I got the crazy idea to do this from Kristi over at The Speckled Dog who is also updating her blog design.  I wonder if she lost any sleep too? Probably not.  She seems like a much more sane person than myself! 

Speaking about insanity, the master bedroom project is coming along and I will be updating more about that later this week.  Let's just say....the bed is finally off the ground!!  But, since it is Memorial Day, I thought I would show you some of the patriotic images and weekend project ideas that I am seeing in the blogosphere. 

Nest of Posies shared this neat sweet idea that she got from allrecipes.com.  She also showed some other ideas for entertaining today.  Click here if you want to see them.

Miss Mustard Seed is spending her holiday weekend as a stylist for a Memorial Day Weekend Wedding.  Here is just one image of what she has designed.  If you would like to see more click here.

Terry over at Forever Decorating is showing off her super cool Porch Post Birdhouses that she set up on poles around her home for the summer ahead.  If you want to see more images of this, including her process click here.


Deneen over at Dreaming in Color showed how to make this adorable flag decoration for the holiday.  I had completely planned on making this, but just couldn't fit it in between all the other stuff I have going on.  Maybe I still will make it this week.  After all....July 4th will be here before we know it!  If you want to see how she made this adorable little decoration out of paint sticks, click here.


I did a little decorating for the holiday myself on my new pine hutch that I talked about this past week.  If you missed it, you can click here to find out more.  Just a little holiday fun.......and now for that nap!


Hope that everyone has a SAFE and Happy Memorial Day!  

-The End-

Sunday, May 29, 2011

The Saga Continues......Part: Too Many

Let the saga begin!  I can feel it in my bones about this element in my master bedroom project.  Every large project has that one thing that no matter how hard you work it, it just eats at your time, has you spinning your wheels without traction and frustrates the tar outta ya.  You start a project looking forward to the hunt, the surprises, the discoveries and the much needed changes.  You do get a lot of that, but there seems to always be that little stick in your craw.   
Interesting, but too busy
for me.

What am I talking about, you ask?  Ready? ..... It's the..... rug.  That darn rug.  I mutter as I drive home empty handed from yet another shopping excursion, "Why oh why, rug, do you have to be such a difficult thing for me?!!"  I have always been a little 'rug challenged.' (My sister has a knowing smile on her face as she reads this.)  I don't know what it is about rugs, but I am suspicious that it may have something to do with the expense.  I mean, is possible to find a fantastic rug  for a reasonable price without killing yourself in the process?   Am I just too cheap to appreciate the cost of this item?  Yikes!  I am one rug challenged gal!  It happens every-time!  My sister has put up with this 'illness' over the years and when she reads this, she gonna say something in the realm of, "Oh no, not again. Oh my god. No."

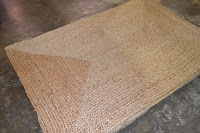
This 4 x 6 jute rug was
 reduced to $250 at ABC Carpet
and Home.  Reduced? 
It's just 4 x 6.  I need 8 x 10.
I have done shopping both online and around town for a rug.  Since I am neutralizing the space, the red Persian rug has been located elsewhere.  I am considering sisal or jute.  I gotta admit that I am shocked at how the price of this type of rug has actually gone up!  We use to be able to pick up one of these at Linens and Things (now closed) for a few dollars.  Now it's become some sort of big deal and the prices are in the 500 dollar range for a 8 x 10.  Go figure.
Cheapest 8 x 10 rug in the remnants
room was $499. Remnants?
Clearance? Really? 

Pottery Barn

I also went to Pottery Barn, Crate and Barrel, Pier One (no longer carries them), and a number of local consignment shops looking. I saw one at a consignment shop but it was all yucky...gross.  Made me realize that there are things not worth buying pre-owned.  Pottery Barn has what I am looking for, but their idea of a sale is 50 bucks off a 500 dollar rug.  I have looked online, but you can't really tell what you are getting.  This is the type of thing that I need to 'put my hands on' before I buy.   I am definitely set on using a natural material for the rug.  I love the texture and the look that it lends to a room.  Here are some inspiration images that have me wanting a jute or sisal rug underfoot.
Hemphill Rug, Orange County CA
  
decorpad.com


via House Beautiful

Decorpad.com


Source unknown
The natural materials on the floor just lend a super nice warmth.  The floors in my master are a medium to light wood.  I just think that a jute rug would really complement the room.  I did bring a 'swatch' home from Pottery Barn the other day. Get this....you can take home a 15 by 15 inch swatch that you pay about 30 bucks for and you have 30 days to return it for a refund.  Not a bad deal. Beats bringing home a rug, only to return it when it doesn't suit the space. (My sister, again, is smiling here.)

If anyone out there has an awesome source for jute or sisal rugs, speak up!  I can use the help.  My sister needs you to help me.  I don't think she can go through yet another rug saga with me.  There have been too many.  She needs the break.

-The End- 

Saturday, May 28, 2011

Action! Forward Progress with the Master Bed and Bath Project

Phew! Two big things happened this week. Jennifer, my cabinet designer, completed the long awaited designs and presented them AND my second shipment of Annie Sloan Chalk paint arrived so I can finally finish painting the bedroom furniture.

My master bed and bath redo has been in a stall and I am kinda sick and tired of sleeping with the bed on the floor.  It was kinda funny at first. My hubby and I made jokes about being 'hip bohemians' with the bed on the floor, but enough is enough!  It's just not cool anymore!! 

Somethings have really changed since I took the above photo.  We have a four foot bead-board treatment running the room.  I replace the side tables and a different set of lamps are sitting on them now.....and for gosh sakes I fixed that darn spindle on the bench with some super duper Gorilla Glue!  Here is a sneak peek at the plans that Jennifer presented.  I am making some changes, like considering a louvred door panel for a beachy look and adding a shallow, medicine-style cabinet to the left of hubby's sink.  It will have a mirror on it similar to my side on the right.   This change is all about function, but we would like it to also change the look of the bathroom as well.    (I pumped up the size of the images, so you can see them better.)

Two sink vanity with storage on the side. Lots of neat
details, like a drawer with a blow dryer that is already
plugged in, side pull outs for my make up and whatnots,
a lit 10 X mirror on an arm. Yeah!
 
"Aerial" view. Rectangular sinks.
We also have a television/electronics spot in a recessed area of the wall in the bedroom that we have had Jennifer re-work for us.  This ugly, flat framing has been there since we moved in.  I wanted her to design the interior space to work for our needs better and re-design the front of the unit to look more like a piece of furniture.  Here is the before picture and the plans following.
-Before-
 
Left:  Interior plans.  Right: Exterior w/doors closed.
The built in will protrude slightly from the wall and have features, like a footed bottom to mimic furniture.  The bottom doors have bead-board in the recessed area to tie the cabinet into the bead-board in the room.  So excited.  Now we just have to get my cabinet maker to get us a quote and get building..... 
Armoire I picked up at
a consignment store.

Today, I will be painting my little fanny off.  I really want to finish the poster bed and get going on the other furniture.  I have picked up a few new things, including this totally neat pine armoire, which I will not be painting, and some fresh linens.  I can't seem to find the rug I want at the price I want.  The hunt continues.  I will also be trying out a few swatches of wall color sometime in the next day or so.  Do any of you out in blog land have a great 'go to' white or neutral wall color?  If so, please share.  I prefer Sherwin Williams products and they can match just about any color.  Can you tell that things are really picking up around here on this project?! 

This neat armoire is going to be used in lieu of the bookcase that I talked about in my blog post Throwing in The Towel, Taking Losses and Going Shopping.  I found it at a consignment shop marked down three times.  The lock has some issues that I need to work through, but I got it for such a cheap price, I didn't mind. 

To top it off....I have been clearing out my master bedroom closet.  I spent the entire day yesterday in there languishing away.  Not my favorite thing to do.  But there is light at the end of that tunnel.  While coats of paint dry today on the furniture, I hope to complete the closet.  If I can get some worthy images, I will share those too. 

So don't forget!  If you have a great 'go to' white or neutral wall paint color that you love, please let me know.  It's so difficult to find just the right shade, not too boring with just the right amount of yummy.....and ya gotta have yummy.
-The End-

Friday, May 27, 2011

Mini String of Paper Pennants Banner

This is a fun, quick little project.  I have been seeing pennant banners all over the blogs for some time.  I decided to tackle a little hour project of mine own.....mainly because I am loving my new pine hutch that I told you about in my post here.  I wanted to do a little 'something something' to hang on the adorable drawer knobs without getting crazy with materials and supplies.

I have seen these made out of fabric, but for this project I am using decorative papers.  It's easier.  I chose a red gingham paper that has been in my stash for over 12 years!  That's right....it is from my original Creative Memories paper supplies that I collected when my kids were babies and toddlers.  I decided on a simple "Welcome" because my dining area is at my front door.  I am using black glitters chipboard letters by Colorbok.

Here is the step by step that I followed to make the cute little string of pennants.

I made a quick banner template out of
copy paper using a straight edge.

I cut out the triangles from the gingham with regular scissors.  I then
used decorative scissor to cut out another triangle that is just slightly larger than
 the gingham triangle. I wanted to mimic a lacy trim. 

I glued together both pieces of paper
 using Rubber Cement.

I then glued the chipboard letters to the pennants, placing
 them at the same height on each pennant.  The gingham pattern made this a breeze.

I then used safety pins to pin each pennant into place on my jute
banner string that I had hung with a simple loop.  I wanted to get an
estimate of space without making it permanent.
 
After hot gluing the pennants
to the jute, I added decorative
bows to each end.

Here is my little paper pennant banner hanging on the pine hutch.

This little project took less than an hour to throw together and clean up.  I plan on making more of these tiny banners, so that I can change them out for special occasions.  Simple, fun, quick, easy, charming.  Gotta love it.
-The End-

I am linking this post to: